As an Amazon Associate. I earn from qualifying purchases
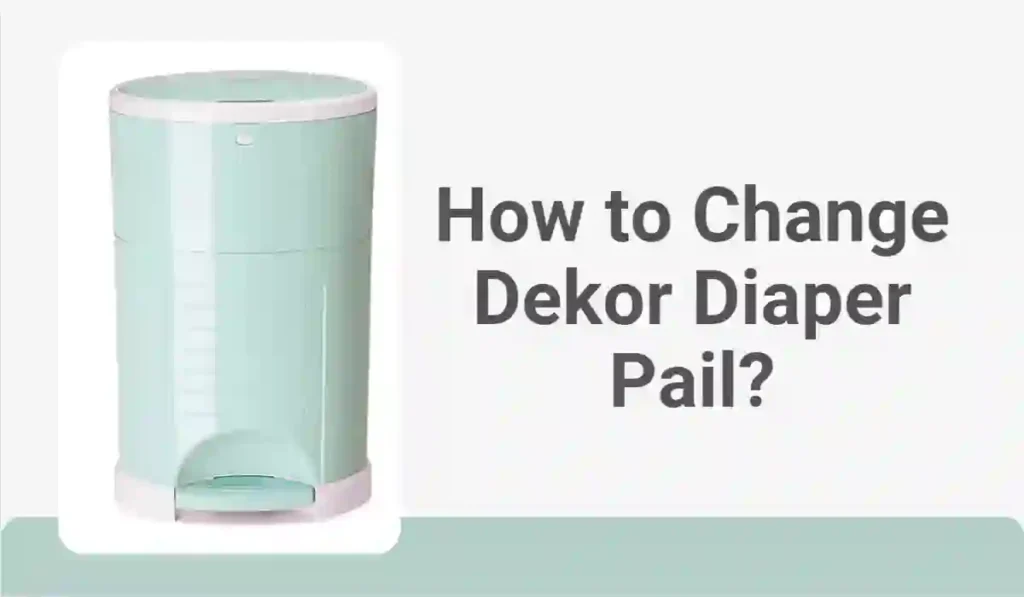
Welcome to the essential guide on how to change the Dekor Diaper Pail – every parent’s trusted ally in managing dirty diapers. The Dekor Diaper Pail is a popular choice for its ease of use and effective odor control, making diaper changes less daunting for new parents.
Regularly changing your diaper pail is a crucial aspect of maintaining a hygienic nursery environment. It prevents the spread of germs and ensures that the pail works effectively, neutralizing odors as it should.
In this guide, we’ll go over step-by-step instructions on how to change the Dekor Diaper Pail, as well as provide tips on maintaining it for long-term use.
Understanding the Dekor Diaper Pail
The Dekor Diaper Pail is a contemporary solution to containing the stench of dirty diapers. Unlike the traditional diaper pails that rely on twisting and sealing to safeguard the surroundings from the malodorous scraps of parenthood, Dekor’s step system ensures hands-free operation. Simply step on the foot pedal to open, dispose of the used diaper, and shut the lid.
It stands out with its unique continuous refill liner system, allowing you to cut the liner when you’re ready and then tie the bottom for disposal. The durable ABS plastic construction also makes it far less likely to scratch or absorb odors over time.
Why Change Your Dekor Diaper Pail ?
Diaper pails are a breeding ground for bacteria and odor-causing germs. As an essential tool in your nursery, it’s crucial to regularly change the Dekor Diaper Pail to maintain cleanliness and ensure that it continues to effectively contain odors.
Furthermore, over time, the continuous refill liner will fill up with used diapers, reducing its capacity for future use. Changing the pail and liner regularly ensures that you always have ample space for your little one’s dirty diapers.
Odor Control
Newborns come with their own suite of smells, and diapers are a major culprit. Frequent diaper changes are essential, and so is regular pail maintenance. A Dekor Pail can lock away odors effectively, but when full or with old diapers inside, it can contribute to a less than fresh nursery.
Preventing Bacteria and Mold Growth
Neglected pails can become a breeding ground for bacteria and mold, introducing potential health hazards to your child’s living space. By changing the pail and cleaning it as needed, you’re tackling invisible foes head-on.
Functional Performance
As with any product, regular maintenance is key to ensuring optimal performance. Changing the Dekor Diaper Pail regularly ensures that it continues to function as intended and provides long-term use for your growing family.
Step-by-Step Guide on Changing Your Dekor Diaper Pail
Changing a Dekor Diaper Pail is simple but paying attention to each detail ensures an effective and hygienic process. Here is a detailed walkthrough:
Step 1: Empty the Pail
The first step to changing your Dekor Diaper Pail is to empty it of any used diapers. Open the pail and using the bag cutter inside the door, cut the plastic refill bag below the knot. Remove the bag of diapers carefully and promptly dispose of it.
Step 2: Remove the Refill
Next, you’ll need to remove the refill system from the pail. This can be done by tying a new knot at the bottom of the refill bag and pulling the bottom through the trap door. Then, release the retaining ring by pressing the button located at the top front of the pail. Lift the refill out, and the pail should be empty.
Step 3: Clean the Pail
With the pail empty, it is time to clean the interior and exterior. The non-porous surface of the Dekor allows for easy cleaning with warm soapy water. Don’t forget to wipe down the trap door and any other parts that may have come into contact with dirty diapers.
Step 4: Replace the Refill
Once the pail is clean and dry, you can replace the refill system. Place the new refill inside the pail with the retaining ring over the top and push down until it clicks into place. Ensure the refill bag is properly aligned with the track on the door and close the door securely.
Maintenance Schedule for Your Dekor Diaper Pail
Regular maintenance prolongs the life of your Dekor Diaper Pail and enhances its effectiveness. Here’s thethe suggested schedule:
- After Every Change: Wipe the pail’s interior with a disinfectant wipe to keep it clean and smelling fresh.
- Weekly: Deep clean the pail with a mild detergent and warm water. Ensure it’s thoroughly dry before replacing the refill.
- Monthly: Check for any signs of wear and tear on the trap door seal or any other components. Lubricate moving parts or replace any components if necessary.
Conclusion
In conclusion, changing your Dekor Diaper Pail regularly is an essential aspect of maintaining a clean and odor-free nursery. Follow the step-by-step guide and maintenance schedule provided in this guide to ensure that your pail continues to effectively contain odors and provide long-term use for your family. Happy diapering!
FAQs
How often should I change my Dekor Diaper Pail?
We recommend changing your pail after every 3-4 days or when it reaches maximum capacity.
Can I use regular trash bags in the Dekor Diaper Pail?
No, we do not recommend using regular trash bags as they may not fit properly and could compromise the effectiveness of the pail’s odor control system. Only use Dekor refill bags for optimal performance.
How do I know when it’s time to change the refill bag?
You will know it’s time to change the refill when you start to feel resistance or see the bag bulging out as you close the door. You can also check the refill gauge located inside the pail for a visual indicator. Overall, we suggest changing the bag when it reaches 2/3 of its capacity.
Is it necessary to clean the pail every time I change the refill bag?
It is not necessary, but we do recommend wiping down the interior of the pail with a disinfectant wipe after every use to maintain cleanliness and prevent odors from building up. Additionally, deep cleaning the pail on a weekly basis is also recommended for optimal maintenance.